What is the Spin Tool in Blender?
The Blender Spin tool extrudes or duplicates selected elements by rotating them around a specific point and axis. It is similar to using a lathe or sweep tool to create circularly extruded objects. The 3D cursor determines the center of rotation, and the axis of rotation depends on the current point of view.
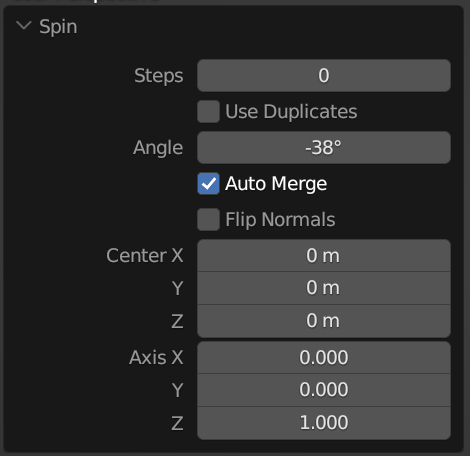
Blender Spin Tool settings explained

- Steps: Determines the number of copies that will be extruded during the “sweep”.
- Use Duplicates: When turned on, the originally selected elements will remain separate from the spun extrusion result, forming isolated islands in the mesh.
- Angle: Sets the degree of rotation for this tool, such as 180 for a half-turn.
- Auto Merge: Automatically merges the initial and final duplicates if they overlap due to a complete revolution.
- Flip Normals: Reverses the direction of normals for the resulting geometry.
- Center X, Y, Z: Sets the spin center, with the default being the cursor position.
- Axis X, Y, Z: Specifies the spin axis as a vector, with the default being the view axis in the viewport.
How to use the Spin Tool in Blender
Here are two of the many ways you can use the Blender Spin Tool:
Spinning Faces, Edges and Vertex of an object
- Select your object and press the ‘TAB’ key to enter ‘Edit Mode’.
- Select a Face, Edge, or Vertex you would like to spin.
- Still in ‘Edit Mode’ go to the ‘Toolbar’ and click on the ‘Spin’ icon.
- A blue arc with two + handles will appear next to your object. Grab and drag any of the + handles until you are satisfied with the results.
- Adjust the other Spin Tool settings until you get desired results.
Spinning objects
- Select your object and press ‘TAB’ key to enter ‘Edit Mode’.
- Still in ‘Edit Mode’ go to the ‘Toolbar’ and click on the ‘Spin’ icon.
- A handle will appear on the 3D space next to your object.
- Grab and move your object away from the center of origin.
- Grab and drag any of the + handles of the blue arc until you are satisfied with the results.
- Adjust the other Spin Tool settings until you get desired results.
- Also, check out Mastering motion blur in Blender: A 2 step comprehensive guide
- Clay renders in Blender: Create stunning results in 8 easy steps
- Make 3D objects look massive in Blender: 7 simple tricks to bring WOW! to your renders
- Convert curves into meshes in Blender: Unlock creative possibilities in 3 simple steps


