A video or image sequence on a plane can be used to act as a TV screen or computer screen on Blender’s viewport. You can also add fake smoke and fire simulation to a 3D scene using a plane and a video of transparent smoke. In this post, you will learn how to use video and image sequences as textures in Blender.
How to setup video textures in Blender
This is a quick set where when you hit the play button on Blender’s timeline panel, the video will also play on a plane mesh in the 3D viewport.
- Note down somewhere the aspect ratio of your video
- Add a plane to the scene
- Adjust the length and height of the plane according to the aspect ratio of your video. For example, if your video resolution is 1280×720 px or 1920×1080, the aspect ratio is 16:9. Therefore, your plane size can be 16 inches by 9 inches or 8 inches by 4.5 inches. If this is a bit confusing, request assistance in the comment section below.
- Select your plane and create a new material
- Switch to the ‘Shading’ workspace so you are able to work on the new material as you view the plane
- In the ‘Shader Editor’, delete the ‘Principled BSDF’ node and leave the ‘Material Output’ node
- Add an ‘Image Texture’ node and an ‘Emission’ material node. Arrange the nodes from your left to right as follows, Image Texture node > Emission Shader node > Material Output node
- Connect the ‘Image Texture node’ color output socket to the ‘Emission node’ color input socket
- Connect the ‘Emission node’ output to the surface input socket of the ‘Material Output’ node
- Click the ‘Open’ button on the ‘Image Texture’ node and add your video
- Set ‘Frames’ and ‘Start Frame’
- Check ‘Auto Refresh’

- If you get sizing issues, UV unwrap your mesh and add a ‘Texture Coordinate’ node before the ‘Image Texture’ node
- Connect the UV output socket of the ‘Texture Coordinate’ node to the vector input socket of the ‘Image Texture’ node
How to setup transparent video textures in Blender
- Repeat the first 5 steps from the above guide
- Select your plane and create a new material
- In the ‘Shader Editor’, add the ‘Principled BSDF’ node
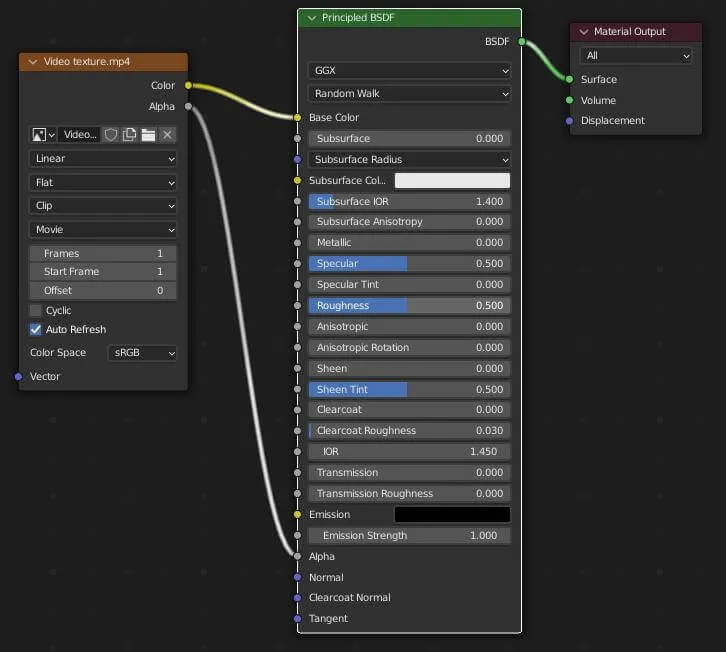
- Add an ‘Image Texture’ node. Arrange the nodes from your left to right as follows, Image Texture node > Principled BSDF node > Material Output node
- Connect the ‘Image Texture node’ color output socket to the ‘Principled BSDF’ base color input socket
- Connect the ‘Image Texture node’ alpha output socket to the’Principled BSDF’ alpha input socket
- Connect the ‘Principled BSDF node’ BSDF output to the surface input socket of the ‘Material Output’ node
- Copy all other BSDF node settings from the image below
- Click the ‘Open’ button on the ‘Image Texture’ node and add your video
- Set ‘Frames’ and ‘Start Frame’
- Check ‘Auto Refresh’

- If you get sizing issues, UV unwrap your mesh and add a ‘Texture Coordinate’ node before the ‘Image Texture’ node
- Connect the UV output socket of the ‘Texture Coordinate’ node to the vector input socket of the ‘Image Texture’ node
How to setup image sequence textures in Blender
Have all your sequence images in the same folder. Repeat the same procedure as for using video textures.


