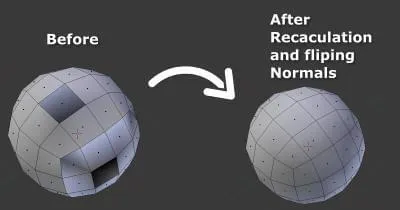
When rendering a mesh with smooth shading enabled, you may notice a dark region or shadow on some faces. Smooth shading on a mesh with ngons produces a more notable appearance, with the ngons going black when rendered.
Why some faces appear dark on your mesh in Blender
‘Normals’ are the reason why some of your mesh’s faces are darker than the rest. Your Normals are not facing the correct direction.
What are Normals in Blender?
A perpendicular line to a surface, a line, a curve, or even a point is referred to as a normal. The average of all the vertices of a face in Blender is presented relative to the point of view in the 3D workspace as the face’s normal. The inclination and location of planes in space can be defined with the use of normals.

Each blue line in the diagram above represents the normal for a face on the sphere. Each line is perpendicular to the face on which it is drawn. You can turn on normals visualization in the Mesh Display panel.
How normals cause some areas of a mesh to be dark than the rest
When sculpting a 3D model on Blender or just manually changing the edges or faces of a model, sometimes normals get flipped. They change direction to the opposite of their optimal direction. Ideally, normals should be facing outward in relation to an object.
This problem leads to the creation of some dark spaces in the 3D model, which can ruin its final look.
How to fix dark faces on your mesh in Blender
Recalculate the normals of your model to make it as clean as possible to eliminate dark regions on your mesh. Here is how you recalculate normals in Blender:

- Select your mesh and press the TAB key to enter Edit Mode
- Select all faces on your mesh by pressing the’A’ key
- Press Shift + N + K or under Mesh > Normals > Recalculate … (The entire menu can also be accessed by pressing Alt + N).
- Then flip normals of selected faces while in Edit mode by going to the 3D Viewport Header. Then go to Mesh > Faces > Flip Normals
Or, if you want to quickly fix all the normals in your mesh, while in Edit mode you can use Recalculate Normals:
- 3D Viewport Header > Mesh > Normals > Recalculate Outside (CTRL + N)
- 3D Viewport Header > Mesh > Normals > Recalculate Inside (SHIFT +CTRL + N)
Note that normals will only be recalculated for selected faces, so you probably want to select all (A) before recalculating.


Looks like a handy site to have in my bookmarks, since I tend to forget Blender shortcut keys and I’ll check out your addons. Thanks
Hi Bill
Thanks for checking us out. Glad we could help.