Animate a Car in Blender with Rigacar Add-On—Easy Rigging & Motion

Part 1: Rig your car

What you need
- Blender version 2.8 or higher
- A blend car model with wheels separated from the body
- Blender Rigacar addon. Available at GitHub in the following link https://github.com/digicreatures/rigacar/releases/download/v6.0/rigacar.v6.0.zip (Thanks to David Gayerie of digicreatures.net for this amazing addon)
- Install Rigacar addon to Blender
The rigging process
1. Ensure the front of your car model is facing -Y (negative Y) direction in the viewport (see image below)

2. Apply ‘Location’, ‘Rotation’, and ‘Scale’ transformations

- Parent each wheel to its tire or rim so it can be one unit each
- Parent all body parts (DO NOT INCLUDE THE WHEELS AND BRAKE CALLIPERS) to the main body frame or an empty object.
- The origins of each control object should be at the center. Use the image below for reference

6. Rename the wheels and body control objects as follows to let the add-on discover the structure of your model:
- Front left wheel to DEF-Wheel.Ft.L
- Front right wheel to DEF-Wheel.Ft.R
- Rear left wheel to DEF-Wheel.Bk.L
- Rear right wheel to DEF-Wheel.Bk.R
- Body parent or control object rename to DEF-Body
- Front right brake caliper to DEF-WheelBrake.Ft.R
- Front left brake caliper to DEF-WheelBrake.Ft.L
- Rear right brake caliper to DEF-WheelBrake.Bk.R
- Rear left brake caliper to DEF-WheelBrake.Bk.L
7. Select all objects of your car model by clicking ‘A’ on your keyboard. Then click ‘Shift+A’. In the drop-down go to ‘Armature’ then select ‘Car (deformation rig)’. The add-on will do the rest.

8. Select the new armature. Click ‘N’ on your keyboard to reveal the properties panel and go down to the ‘Rigacar’ tab. Click on ‘Generate’. Your car is now rigged.

In the next tutorial, you will learn how to animate your newly-rigged car.
Part 2: Animate your car
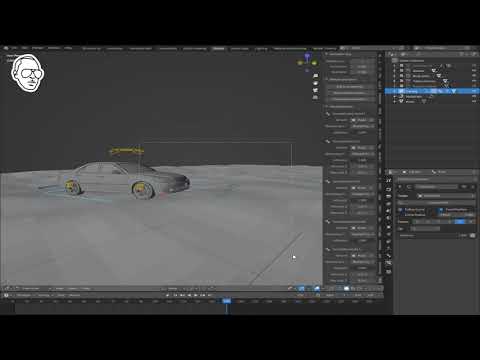
The animation process
- Add a plane that you will be using as ground or road.
- Make the plane uneven using the displacement modifier
- Select the car rig and go to pose mode.
- Click ‘N’ to reveal the properties panel
- On the Rigacar tab, select one picker at a time to select your plane as shown in the video above.
- Now when you select the root bone of the car and move it along your plane, it should react to the uneven road.
- All that is left to do is bake the steering movement and wheel rotation as in the video above.
If you have any questions, put them in the comment section below. Request for project assistance from one of our professional animators here. Check out more animation and visual effects tutorials here.

Leave a Comment
Join the Conversation