
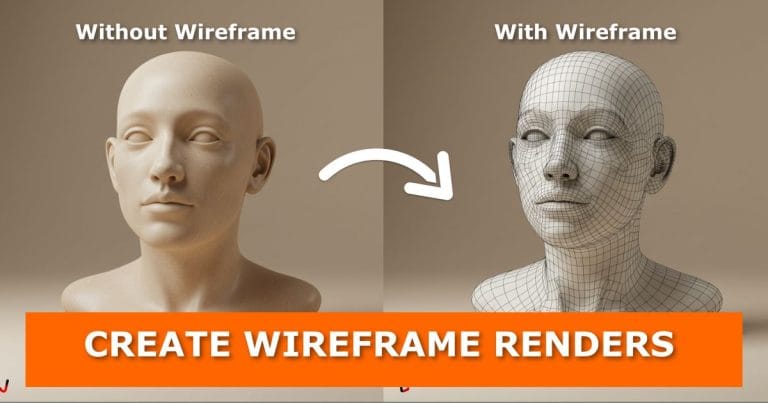
Wireframe renders are a favourite among 3D artists. They help show structure, explain topology, or add a stylish touch to presentations. If you’ve ever wondered how to render clean wireframes in Blender, you’re in the right place.
In this tutorial, I’ll walk you through three different ways to create wireframe renders in Blender—each with its strengths. Whether you need something quick for previews or higher-quality results for final outputs, you’ll find a method that fits your workflow.
Video Tutorial

Method 1: Viewport Render for Quick Results
The most direct way to show wireframes in Blender is through the Overlays panel.
- Head to Overlays > Wireframes.
- Adjust the percentage and opacity to control visibility.
- Customize viewport shading and lighting to suit your needs.
But here’s the catch: this only works in the viewport. If you try to render it normally, you’ll just get a flat render without wireframes.
That’s where the Viewport Render option comes in:
- Go to the View menu and select Viewport Render Image (or Animation).
- Clean up extra lines by turning off overlays you don’t need.
- Press Alt+A to deselect everything for a tidy shot.
This method is lightweight—Blender only uses 8 samples—so don’t expect ultra-high quality. But for previews, presentations, or fast animation renders, it’s a reliable choice.
If you want to dive deeper into viewport tricks, check out Blender Viewport Render.
Method 2: Freestyle Rendering for Clean Line Art
If you need sharper and more professional-looking wireframes, Blender’s Freestyle rendering is your friend.
Here’s how to set it up:
- In Render Settings, scroll down and enable Freestyle.
- Add an override material (a simple grey works best).
- Assign the override under View Layer > Override.
- Switch to Edit Mode, select all edges, and mark them as Freestyle Edges.
- Adjust Line Thickness (around 0.3px looks better than 1px).
When you hit render, Blender will first render the scene, then overlay the Freestyle lines. This gives you high-quality results that scale with resolution.
Pro tip: Experiment with different Edge Types and Stroke Colours for unique styles.
If you want to polish your renders further, check out How to Eliminate Noise from Renders in Blender
Method 3: Grease Pencil Line Art Modifier
The third method is the most flexible—and often the fastest for good results. It uses the Grease Pencil Line Art modifier.
- Add a Grease Pencil stroke and move it out of the camera view.
- With the stroke selected, go to Modifiers > Add Line Art.
- Choose your source (object or collection).
- Set the line colour to black (works well with a white override material).
- Adjust Thickness (1–2px) and Opacity for clarity.
This method gives you real-time wireframe previews in the viewport. It’s easy to copy between projects, making it a flexible tool for different workflows. The only trade-off: it’s heavier on performance compared to the other methods.
For more creative uses of Grease Pencil, you may enjoy How to Add Notes in Your Blender File.
Wrapping Up
Each method has its place:
- Viewport Render – quick previews and fast animation wireframes.
- Freestyle – high-quality, scalable renders with customizable edges.
- Grease Pencil – flexible and real-time, great for experimentation.
Think about your project needs—speed, quality, or flexibility—and pick the method that fits.
Ready to Experiment with Your Own Models?
Now that you know three ways to render wireframes, it’s time to try them out.
- Have you used wireframe renders before, or is this your first time?
- Which method seems most useful for your workflow?
Drop your thoughts in the comments—I’d love to hear your approach. And if you want to expand your Blender skills, check out these tutorials:
- Create Realistic Glass in Blender Eevee
- How to Create Clay Renders in Blender
- Wrap Your 3D Model in Plastic in Blender
If you enjoyed this post, subscribe for regular updates and share it with fellow 3D artists. More step-by-step guides are coming your way.


