
If you’ve ever cut a circle hole into your mesh in Blender and ended up with messy geometry, you’re not alone. Many beginners (and even experienced users) use approaches that look fine at first but fall apart once subdivision or modifiers come into play. In this tutorial, I’ll show you the right way to make clean and professional circle holes that will hold up under any workflow.
The Wrong Way to Do It
Most people jump straight into cutting out faces or adding cylinders to punch through the mesh. This quick approach might seem fine, but it leaves behind stretched faces and uneven topology. When you add subdivision or try to sculpt over it, the mesh breaks down.
Video Tutorial

The Professional Method
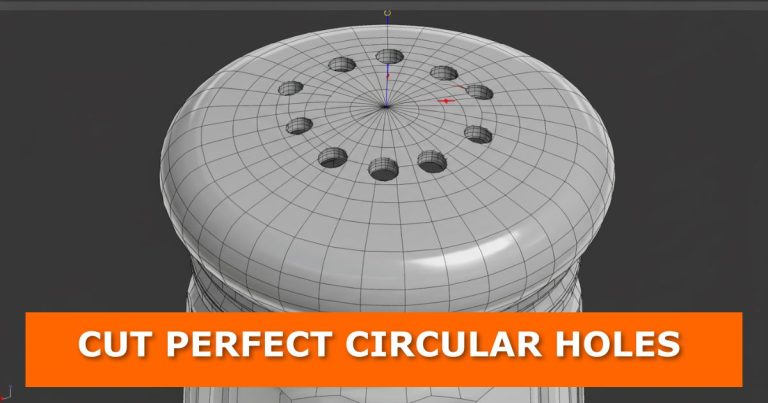
Here’s how you can create clean circle holes that subdivide beautifully:
- Select the vertices you want to cut.
This defines where your circle hole will appear. - Use bevel to shape the hole.
Press Ctrl + B to bevel, then press V to vertex bevel.
In the bevel properties, set the segments to 5 and reduce the shape value to around 0.1. - Adjust the circle size.
Play with the bevel width to control the diameter of the hole.
Cleaning Up the Faces
After bevelling, you’ll see multiple circular face regions. To quickly clean them:
- Select one of the circles.
- Press Shift + G and choose Face Regions to grab all of them.
- Delete the selected faces.
And just like that, you’ve got a perfect circle cut into your mesh with clean topology.
Why This Works
This method keeps your geometry evenly distributed, which means modifiers like subdivision surfaces won’t collapse your mesh. It also makes future edits easier, saving you headaches when modelling complex objects.
Clean topology is essential for professional animation work, where models need to deform smoothly and maintain their structure through complex character movements.
If you’ve struggled with messy bevels before, check out this guide on fixing bevel overlap issues in Blender for more control.
Related Tutorials You’ll Love
Want to sharpen your modelling workflow? Try these quick Blender tutorials:
- Straighten loop cuts in Blender
- How to fix extrusion issues in Blender
- Blender extrude tricks
- How to maintain sharp edges with subdivision surfaces
- Clean up text topology in Blender
Proper circular hole techniques are fundamental in visual effects production, where hard-surface modeling requires precise topology that holds up under close-up camera scrutiny.
Ready to Take Your Modelling Further?
Now that you know how to make clean circle holes, try applying this technique to more complex shapes. The more you practice, the faster and cleaner your models will become.
Whether creating detailed product models for web design showcases or technical visualizations, mastering clean circular cuts ensures your 3D assets look professional from every angle.
Have questions about this technique or want me to cover other tricky Blender workflows? Drop a comment below and let’s start a discussion. And don’t forget to explore more Blender tips and tricks across the blog—you’ll always find something new to improve your skills. If you enjoyed this tutorial, subscribe for updates, share it with a fellow Blender artist, and check back regularly for fresh Blender techniques.


