Block Your Shot in Blender, Then Let AI Do The Rendering
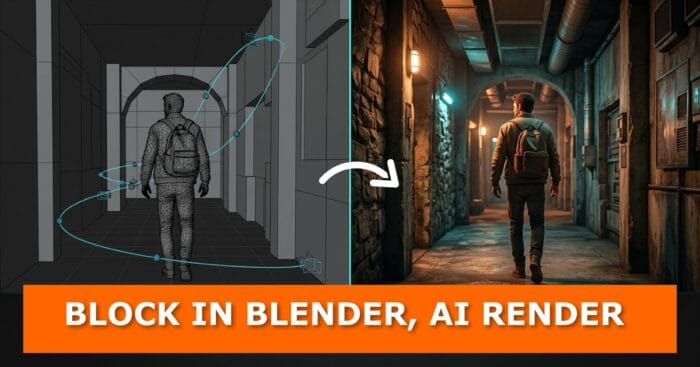
If you’ve been burning credits on AI video generators only to watch the camera drift, characters swap seats, or a “cinematic” prompt turn into total chaos, there’s a fix, and it starts inside Blender, not inside your AI generator’s prompt box.
The workflow is simple to state and genuinely clever in practice: build your camera moves, blocking, and timing as a rough 3D scene in Blender first, using Claude to construct it from plain-English descriptions, then hand that locked-down blockout to an AI video generator as a reference. The AI stops guessing at spatial logic because you’ve already solved it in 3D. That one shift is the difference between a shot that nails the exact camera move you asked for and one that drifts, flips, or randomly swaps two characters’ seats mid-scene.
Setting Up the Bridge Between Blender and Claude
This workflow runs on the Higgsfield Blender add-on, which connects Blender to Claude through an MCP bridge so Claude can build and edit real, editable 3D geometry, not just spit out a static render. Here’s the setup:
- Download the add-on. Grab the zip from Higgsfield’s Blender plugin page and drag it directly onto an open Blender window. It installs and enables itself, no separate installer needed. It currently supports Blender 4.2 through 5.1, so if you’re still running an older LTS, this is a good excuse to update.
- Copy the bridge URL from inside the add-on.
- Connect Claude. Open Claude, head to Settings, add a custom connector, and paste in that bridge URL.
- Sign in from the viewport. Once Blender and Claude are linked, a Higgsfield toolbar appears right in your 3D view, letting you drop in assets, generate meshes, or build entire scenes without leaving Blender.
With the bridge live, Claude and Blender are fully synced, and every prompt you type gets turned into actual scene geometry you can inspect, tweak, and reuse.
If addon-hunting for your Blender workflow is a regular habit, this is exactly the kind of tool worth tracking alongside the picks in our roundup of AI-powered addons for Blender, and if you’ve never installed a third-party add-on before, this quick guide walks through the basics.
Step One: Lock the Camera Before You Spend a Single Credit
Instead of typing a prompt and hoping for a smooth continuous shot, the smarter move is describing the scene to Claude directly: a corridor, a character walking through it, the camera following behind. Claude builds a rough blockout in Blender using solid 3D production rules, so the geometry stays consistent instead of breaking apart the way a pure text prompt often does.
From there, it’s an iteration loop:
- Look at the first pass through the camera view (press zero in Blender to jump into camera view).
- Ask Claude to add detail, texture the walls, vary the framing, or animate the lens.
- Watch the camera flow from an orbit around a character’s back into a full-body profile shot and then into a top-down establishing shot, all in one continuous move.
One tip worth remembering: switching Claude into cowork mode and setting the model to a higher-effort tier noticeably improves how efficiently it handles a build like this.
Once the blocking feels right, export it as a quick reference video (Output Properties, pick a resolution and frame rate, then Viewport Render). That short clip becomes the “structural log” you feed into an AI video generator, which can then write out a scene-by-scene prompt matching your exact camera moves. The result: the tilt-up lands on cue, the camera sweep reveals what it’s supposed to reveal at the right moment, and the tracking shot doesn’t wander. Run the identical prompt without the 3D blockout, and the camera guesses wildly instead.
If camera control is what excites you here, it’s worth digging into the addons built specifically for it in our guide to the best Blender camera add-ons, and if you want to understand orbit paths at a more fundamental level, this tutorial on orbiting a camera around an object is a solid starting point.
Dialogue Scenes: Where Most AI Video Tools Fall Apart
Dialogue is notoriously the hardest thing to get right in AI video. Rooms break, characters flip position between cuts, and getting one clean result usually means batching dozens of generations and burning through credits with no guarantee of consistency.
Blocking it in Blender first solves this. Building a scene with six people around a table, four camera cuts, and a full 30 seconds of back-and-forth dialogue works the same way real film crews handle previs: figure out camera spots, shoulder frames, and eyelines before touching a single light. From there:
- Describe the round table setup and character positions to Claude with no faces or bodies yet, just gray placeholder boxes.
- Add camera movement by giving Claude an actual shot list, not a vague “make it cinematic” request, but specific rails, targets, and cuts, the way you’d brief a real camera operator.
- Refine the feel. A camera move that’s too smooth can look artificial, so asking for subtle handheld sway adds weight and realism.
- Let Claude write the dialogue itself, using the camera setup it already built as context, and generate the final video from that blocking plus the dialogue prompt.
The payoff is real: six characters, zero seat swaps, and every line landing on the correct face. Skip the Blender blockout and run the same prompt, and characters visibly swap positions from cut to cut, breaking the 180-degree rule that keeps a scene spatially coherent for the viewer.
Three Viral Camera Moves, No Crane Required
Some of the most recognizable shots in music videos and action films (a sweeping continuous orbit, a “floor rise” that rockets up through a building revealing a new scene on every level, or a whip-fast robotic-arm lock) normally take a full crew and heavy rigging to pull off. Describing them to Claude and letting it build the camera path in Blender gets you the same result without the crane truck.
A nice bonus with this approach: because the camera moves along an actual path with control points, you can grab any point afterward and drag it to tweak the angle, with zero reprompting needed. It’s a level of manual control you simply don’t get from a text-only prompt. If your Blender setups tend to involve multiple camera paths working together, our piece on making a Blender camera follow two paths at once pairs well with this technique.
Client Changes Without Starting Over
For product and ad work, the real nightmare usually isn’t rendering, it’s client notes. “The opening is boring,” “we can’t tell the flavors apart,” “where’s the logo.” Normally, every note means rewriting the prompt from scratch and rolling the dice again.
Because the blockout lives in Blender as an editable timeline, revisions become a recut instead of a rebuild. You can remap the edit line by line, changing what the camera does, how objects move, and where new elements enter, then regenerate. You can even leave specific scenes intentionally blank in the blockout (skip modeling liquid or complex effects, for instance) and let the AI fill those in during generation.
Reusable Blocking: One Edit, Multiple Visual Styles
Here’s the part that changes the economics of this whole workflow. A finished blocking file has two halves: the structural layer (the cuts, camera moves, and timing) and the style layer (what the world actually looks like). The structural layer doesn’t have to change when you want a different look.
That means the same 19-shot sequence can be regenerated as photorealistic, then as a 2D-ink illustration, then as a stylized 3D toy aesthetic, with every cut and every camera drift matching frame for frame across all three versions. For anyone running a studio or pitching clients, that’s the whole game: multiple visual directions from a single day of blocking work, letting the client choose a look with the edit already locked.
It’s a neat example of where AI-assisted production is heading generally: not replacing the craft of blocking and cinematography, but removing the tedious re-execution every time a client wants to see a different mood or style.
For more on how AI keeps reshaping the everyday Blender pipeline, our breakdown of turning a single photo into a full 3D world and the roundup of tools in a multiplayer AI world model, free retopology, and eight other things that just changed 3D are both worth a look, alongside the full account of Claude running an entire Blender and ComfyUI pipeline solo.
Watch the Full Walkthrough
The full demo, including the side-by-side comparisons between blocked and unblocked results, comes from Adila’s Higgsfield creator profile, where she breaks down the corridor shot, the six-person dialogue scene, the viral camera moves, the soda ad, and the full 19-shot car commercial in detail.

Ready to Block Your Own Shots?
This workflow is new enough that most creators haven’t caught on yet, which makes now a good time to get comfortable with it. Start small: block a single continuous shot in Blender, hand it to your AI video tool of choice, and compare it against a version generated from text alone. The difference tends to speak for itself.
Got a shot you’re struggling to lock down, or a Blender + AI combo you want us to dig into next? Drop it in the comments, and check back soon for more breakdowns of how AI tools are reshaping the Blender pipeline.

What do you think?
Join the Conversation