Make Your Blender Camera Follow Two Paths at Once

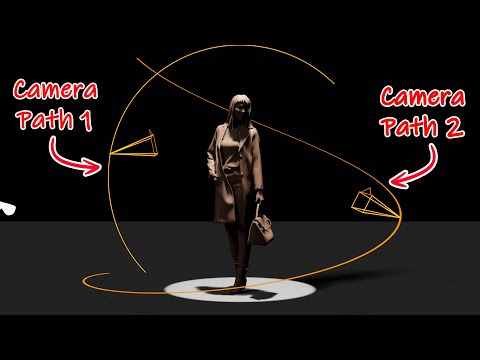
You make a camera follow two different paths in Blender by adding two separate Follow Path constraints — one for each curve — then using keyframed Influence values to hand control from the first constraint to the second at the exact frame where you want the switch to happen. It sounds fancy, but it’s really just two constraints having a very polite conversation about whose turn it is to drive.
If you’ve ever tried to fake a two-path camera move by manually keyframing location, you already know the pain. The Follow Path constraint is smooth by default, but it only knows how to follow one curve at a time. So what happens when your shot needs the camera to glide along one bezier curve, then jump onto a completely different one? That’s exactly the trick we’re breaking down today, straight from a clip by 5 Minutes Blender, one of the best channels for fast, no-fluff Blender tips.
Let’s get your camera hopping between paths like it’s always known how.
What You’ll Need Before You Start
- A camera object in your scene
- Two bezier curves acting as your camera paths
- A target object for your camera to look at (optional, but it makes everything look intentional)
If you’re still getting comfortable with basic camera controls, it’s worth bookmarking the quickest way to point a camera in Blender and how to make a camera the active one in your scene — both come in handy here.
Step 1: Set Up the Camera on the First Path
- Select your camera and make sure its location offset is reset to zero — any leftover offset will throw off the Follow Path math later.
- Open the Constraints tab and add a Follow Path constraint.
- In the Target field, select your first bezier curve.
- Enable Fixed Position. This gives you an Offset Factor slider you can animate to move the camera along the curve.
- Go to frame 1, set the Offset Factor to 0, and insert a keyframe.
- Jump to frame 100, move the Offset Factor to send the camera to the other end of the curve, and keyframe it again.
At this point, your camera will smoothly travel along path one from frame 1 to frame 100. Nothing fancy yet — this part is basically the same setup you’d use to rotate an object forever in Blender or drive any other keyframed motion.
Step 2: Add the Second Path and Its Constraint
- Add a second Follow Path constraint to the same camera.
- In its Target field, select your second bezier curve.
- Notice the Influence slider on this constraint — this is your on/off switch. At 0, the constraint does nothing. At 1, it takes full control.
Here’s where the handoff happens:
- At frame 100, set the first constraint’s Influence to 1 and the second constraint’s Influence to 0, then keyframe both.
- Move to frame 101, and flip it — first constraint’s Influence goes to 0, second constraint’s Influence goes to 1. Keyframe both again.
- Enable Fixed Position on the second constraint too, and keyframe its Offset Factor at 0 for frame 101.
- Go to frame 200, move the Offset Factor to send the camera along the rest of the second path, and keyframe it.
Play the animation now and you’ll see the camera follow path one until frame 100, then jump straight onto path two and ride it out to frame 200.
Step 3: Add a Track To Constraint for Natural Camera Angles
A camera that just slides along a path without ever adjusting its aim looks robotic. Add a Track To constraint on top of your two Follow Path constraints, and set its Target to whatever object you want the camera watching — a character, a product, a building, anything. This alone makes the shot feel directed instead of accidental.
Step 4: Smooth Out the Jump Between Paths
That hard cut at frame 100 works fine if you want a deliberate camera cut, but if you’d rather have a graceful handoff, here’s the fix:
- Open the Timeline editor. You’ll see the four keyframes controlling your Influence values.
- Shift-select the two keyframes sitting at frame 100 (the ones where the influence swap happens).
- Slide them forward along the timeline — try around 50 frames as a starting point.
What this does is stretch out the crossover: instead of an instant swap, the first constraint’s influence gradually decreases while the second constraint’s influence gradually increases across that gap. Play it back and you’ll get a smooth blend from path one into path two, instead of a jarring snap.
And the best part? This isn’t limited to two paths. Repeat the same influence-swapping trick and you can chain together three, four, or as many camera paths as your shot needs.
Why This Trick Actually Matters
Multi-path camera rigs are the backbone of a lot of cinematic Blender work — flythroughs, product reveals, architectural walkthroughs, you name it. Once you’ve got this pattern down, it pairs nicely with other keyframe-heavy workflows, like baking your animations and simulations to keyframes once you’re happy with the result, or adding motion blur to sell the speed of the camera move. If you’re building out full animated sequences, it’s also worth checking how object animation copying works in Blender so you can reuse this exact rig on other cameras without rebuilding it from scratch.
Give It a Try
Set up two curves in your own scene and see how far you can push this. Three paths? Five? A camera that loops back to where it started? Once you understand the Influence handoff, the only limit is how many bezier curves you’re willing to draw.
Got a shot you’re trying to pull off with this technique? Drop a comment and describe what you’re building — and if you want more fast, practical Blender tricks like this one, take a look through the rest of our Blender tutorials or check back soon for the next one.

What do you think?
Join the Conversation