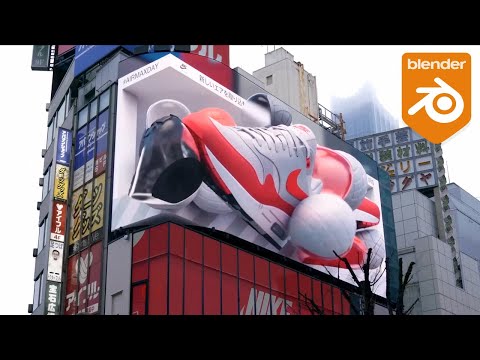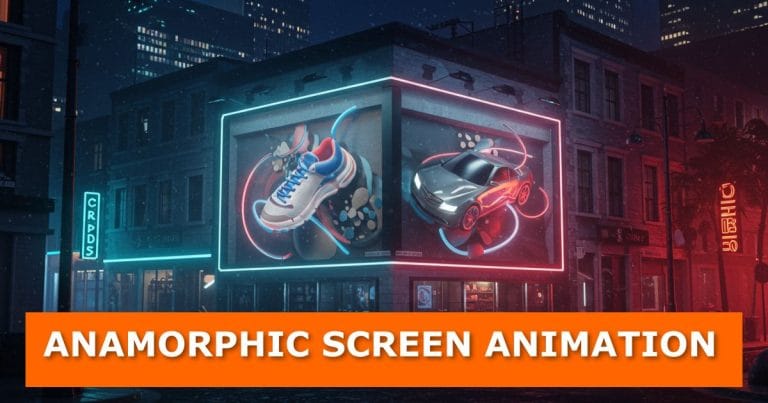
Have you ever seen those massive screens on the side of a building where it looks like a car, an animal, or some wild object is jumping out into the street? That mind-bending illusion is called a 3D anamorphic screen, and it’s one of the coolest advertising tricks out there.
The best part? You can create this effect in Blender with some smart camera tricks and rendering. It looks complex, but the process is surprisingly straightforward once you know the steps.
If you are experimenting with creative motion graphics, you might also enjoy how to create floating helium balloons in Blender for playful animation projects.
In this tutorial, I’ll Walk you through how to set up your own anamorphic screen animation in Blender. By the end, you’ll know how to design and render a video that could stop people in their tracks—just like the ones you’ve seen on YouTube or in city centres.
Step 1: Build Your Screen
Start by creating the “billboard” itself.
- Add a default cube in Blender.
- Move it up by about 5 meters.
- Adjust your camera with Ctrl + Alt + 0 and align it to human height (around 1.75 m).
- Extrude the side backwards to make the screen larger.
- Bevel the corner with Ctrl + B. Use a number of segments divisible by 90 (15 works well). This will make things easier later when unwrapping.
- Add a few loop cuts so the screen faces are evenly sized.
Next, separate the front geometry (P → Selection) and create a backup copy underneath your scene. The backup will be used later for projecting the animation.
To better control your setup, you can check quickest and easiest way to point a camera in Blender so your camera matches the illusion perfectly.
Step 2: Create a Simple Animation
We need something to display on the screen.
- Cut a hole in your screen mesh for the animation area.
- Add an area light to brighten it up.
- Instead of Blender’s default monkey, drop in a face builder head mesh.
- Animate the head moving across the screen from one side to the other.
Once your animation is set, cut it to 50 frames at 30 fps.
Step 3: Render the Animation
- Go to Render Properties → Film → Transparent.
- Set the output format to PNG with RGBA enabled.
- Pick a new folder just for this project.
- Render out the animation as individual frames (Render → Render Animation).
Now you’ve got a sequence ready for projection.
Step 4: Project the Animation onto the Screen
Here’s where the anamorphic illusion starts taking shape.
- Take the backup screen you saved earlier and move it back up.
- Add a new material, throw in an Image Texture node, and load one of your rendered frames.
- Plug it into Emission and set the strength to 1 or 2.
- Add a UV Project modifier. Target your camera, set the aspect ratio correctly (for 1080p, use 1.77778), and watch the projection snap into place.
Step 5: Flatten the Geometry
To prepare the final video, you’ll need to unwrap the bevelled corner.
- Duplicate the screen and apply the UV Project modifier.
- Go to wireframe view and rotate each bevel segment manually using the 3D cursor as a pivot.
- Use shape keys to toggle between the curved and flattened states.
This ensures your animation plays correctly when displayed on a real screen.
Step 6: Set Up a Second Camera
- Add a second camera and make it the active one.
- Switch to Orthographic view.
- Adjust the orthographic scale and resolution until the screen fills the frame.
- Centre the camera so the animation maps cleanly.
Now you’re ready for the final render.
Step 7: Render the Final Video
- Load your image sequence into the screen material instead of a single frame.
- Enable Cyclic and Auto Refresh so it plays like a real animation.
- Switch output to FFmpeg Video → MPEG-4 → H.264 codec.
- Render using Eevee for faster results.
You now have an MP4 ready to play on an anamorphic billboard.
Step 8: Preview on the Original Camera
To see how it will look in real life:
- Switch back to your first camera.
- Load the rendered video onto your original screen mesh.
- Unwrap and adjust the UVs manually if needed.
The illusion should now look like objects are popping out of the screen.
Wrapping Up
And there you have it—a complete walkthrough of making a 3D anamorphic screen animation in Blender. Today’s example was simple, but you can take this technique much further. Imagine creating full product commercials, animated mascots, or high-end advertising campaigns.
Over to You
If you found this tutorial helpful:
- Leave a comment with your questions or ideas for future tutorials.
- Subscribe for more Blender animation guides.
- Share this post with a friend who loves 3D design.
- Check back often for new tutorials and updates.
- For more advanced alignment, you may want to try how to calibrate and match a camera to an image using fSpy and Blender
- If you want to add flair to your animation, consider how to use motion blur in Blender to make the movements smoother and more realistic.
- To ensure high-quality exports, check how to render an animation as video in Blender, or if you need transparency, see how to render transparent animation videos in Blender’s Cycles and Eevee render engines.
- For more creative approaches to Blender animation, you may also be interested in how to animate and control a fish in Blender.
Video Tutorial