
We’ve all been there. You gather your reference photos, open Blender, and then — nothing happens. The blank screen stares back at you, and the pressure to make something “perfect” makes it even harder to begin.
Sound familiar? This is exactly where blockouts save the day.
A blockout lets you jump in without overthinking. Instead of stressing over fine details right away, you start with simple shapes that form the foundation of your scene. You build momentum, and suddenly, starting feels a lot less scary.
If you’re working in Blender 4.2 or above, this guide is for you. Let’s walk through the entire process, step by step.
What Is a Blockout in Blender?
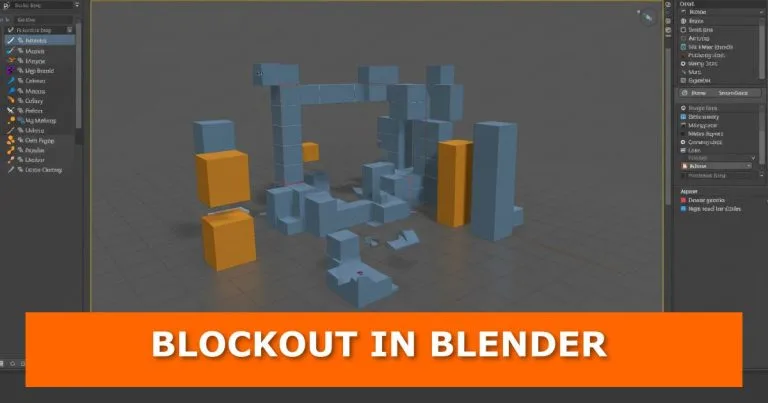
A blockout is a rough, early version of your scene built from basic shapes — cubes, spheres, and cylinders. Think of it as sketching with geometry. You are not worrying about fine details or textures yet. The goal is to quickly map out your scene, test your composition, and see how everything fits together before you invest hours in sculpting or modelling.
Professional 3D artists rely on blockouts because they follow a simple but powerful rule: get the big picture right before worrying about the small stuff.
Blockouts work equally well whether you’re building a character, an environment, a hard-surface prop, or a level for a game.
Related read: Blender Extrude Tricks — perfect for adding detail once your blockout is solid.
Why Blockouts Make Starting So Much Easier
Here’s what a blockout does for you:
It removes creative pressure. You are not aiming for perfection right away. You are just exploring. That’s liberating.
It helps you see the big picture. You will spot issues in scale, proportion, or composition before you’ve spent hours on something that doesn’t work.
It speeds up your workflow. You skip the dreaded “staring at a blank screen” phase and dive straight into building.
It gives you a clear roadmap. Once the rough shapes are in place, you know exactly what needs to be detailed and in what order.
Think of it like the foundation of a building. If the foundation is off, the whole structure suffers. A strong blockout keeps your proportions and layout correct so everything you build on top of it actually works.
Step 1: Set Up Your Camera First
Before placing a single shape, position your camera. This step is easy to skip, but it makes a huge difference.
Setting your camera first gives you a frame to work within. You’re essentially deciding your viewing angle before arranging your scene — similar to a photographer choosing their position before setting up a shot.
In Blender 4.2 and above, you can press Numpad 0 to jump into the camera view. From there, use N panel > View > Lock Camera to View to navigate freely while keeping your camera framing in mind.
Also consider setting up a reference image as a background guide. Check out this tutorial on how to set a background image in Blender for modeling reference to make this even easier.
Step 2: Add Your Primitives
Now the fun begins. Use Blender’s built-in primitives — the basic shapes available when you press Shift+A in the 3D viewport — to represent the major elements of your scene.
Here’s how to think about it:
- A cube can stand in for a building, a crate, or a wall section.
- A cylinder can represent a pillar, a tree trunk, or a barrel.
- A sphere works as a placeholder for a head, a boulder, or any rounded mass.
- A cone can stand in for a roof, a spire, or a spike.
You are not aiming for accuracy at this stage — you are building a rough sketch. Drop in shapes, scale them roughly, and position them in your scene. Don’t overthink placement. You can move everything later.
A quick tip: Press G, S, or R to grab, scale, or rotate objects. Add X, Y, or Z immediately after to lock the transformation to an axis. This keeps your blockout clean and controlled.
Step 3: Use Snapping to Keep Things Aligned
In Blender 4.2, snapping got several important improvements that make blockouts much cleaner and faster.
Enable snapping by clicking the magnet icon in the 3D Viewport header, or hold Ctrl to snap temporarily while transforming. You can choose to snap to the Grid, Vertex, Edge, Face, or Face Center — depending on what you need at that moment.
For blocky environments and level design, Grid Snap is your best friend. It ensures your shapes line up neatly, like building with Lego bricks. You can also combine multiple snap modes at once using Shift+LMB on the snap target icons.
Another useful addition in Blender 4.0 and above is the Snap Base feature. This lets you set a custom snapping point on the fly while transforming objects — without changing the object’s origin. It gives you a lot of flexibility when placing blockout pieces precisely.
Step 4: Use Collections to Stay Organised
As your blockout grows, your scene can get messy fast. Collections in Blender are like folders that help you group related objects together.
For example, you might create a collection called “Buildings”, another called “Props”, and another called “Characters”. You can then hide or isolate groups with a single click in the Outliner.
This becomes especially useful when you’re refining your blockout — you can hide the parts you’re not working on and focus only on the section you’re detailing.
To create a collection, select your objects, right-click, and choose Move to Collection, or press M.
Step 5: Refine as You Go
Once you’ve placed your rough shapes, begin adjusting their size, rotation, and position to more closely match your reference or vision. This is not detailing — it’s just pushing and pulling your blockout shapes until the scene reads correctly.
Ask yourself:
- Does the scale feel right? (Bring in a simple human-height reference cube to check.)
- Do the proportions match my reference?
- Does the composition look interesting from my camera angle?
Iterate freely at this stage. The blockout exists so you can experiment without consequences. Delete shapes, try different configurations, and start over sections if needed. Nothing you do here is wasted — it’s all part of finding the right foundation.
Related read: How to Focus on the Selected Object in Blender — useful for zooming in on individual blockout pieces.
Step 6: Keep Your Geometry Simple
This one is important. Resist the urge to add detail too early.
Your blockout objects should stay as simple as possible. Avoid curves, subdivisions, or fine edge work at this stage. The shapes exist only to communicate mass, position, and proportion. If you find yourself adding loops and bevels on a blockout shape, stop — you’ve moved past the blockout phase prematurely.
This discipline pays off. Simple geometry is easy to delete, replace, or reshape. Complex geometry locks you in.
When you do move into the detailing stage, you’ll appreciate starting with a clean, lightweight blockout underneath.
Related read: How to Reduce Geometry (Polygon Count) on a Mesh in Blender — helpful for keeping things clean.
The Blockout Addon for Blender (Worth Knowing About)
If you want to speed up your blockout workflow even further, there is a dedicated Blockout addon available on the official Blender Extensions platform (extensions.blender.org). It supports Blender 4.2 and above.
The addon lets you:
- Click and drag to place shapes directly in the viewport, then refine them live using the Redo panel.
- Run a streamlined Boolean workflow — Union, Cut, Slice, Intersect, and Carve operations are handled cleanly with minimal setup.
- Use custom drawing planes (press Space to set one anywhere in your scene, Alt+Space to reposition it), which is powerful for angled surfaces or non-standard layouts.
- Veil and Unveil boolean operands (V / Alt+V) for a clean viewport while working.
- Add Bevels interactively using B or Ctrl+B, with scroll to adjust segments.
It’s a great tool for hard-surface artists and environment designers who need to move fast in the early stages.
You can install it by going to Edit > Preferences > Get Extensions in Blender 4.2 and searching for “Blockout.”
Related read: How to Install Add-ons in Blender
Common Blockout Mistakes to Avoid
Jumping into detail too soon. The blockout phase is for composition and proportion, not edge loops and bevels. Hold off on detail work until your blockout is fully approved.
Skipping the camera setup. If you haven’t set your camera, you’re designing without a frame. Always know your final angle first.
Ignoring scale. A scene that looks fine in the abstract can fall apart when you realise the door is twice the height of a person. Always test scale against a known reference.
Not using collections. A flat list of 50+ unnamed objects will slow you down. Organise as you go.
Overcomplicating the shapes. If your blockout objects have more than a handful of polygons, you’re probably adding detail too early.
From Blockout to Finished Model
Once you’re happy with your blockout, the real work begins — but it’s so much easier because you’ve already solved the hardest problems.
You’ll transition into mid-detail work, where you start fleshing out more defined shapes that follow the proportions you’ve established. From there, you move into fine details, texturing, and lighting.
Some helpful next-step tutorials to bookmark:
- Best Blender Addons for Modeling — speed up your detailing phase.
- How to Maintain Sharp Edges When Using Subdivision Surface Modifier — essential when transitioning from blockout to final mesh.
- How to Remove Double and Overlapping Vertices in Blender — keep your mesh clean as you refine.
- How to Convert Curves into Meshes in Blender — useful when you start adding organic shapes.
- Clean Up Text Topology in Blender — great for keeping your overall mesh tidy.
- Blender Extrude Tricks — take your shapes to the next level.
Video Tutorial
Watch the full blockout walkthrough in the video tutorial below, courtesy of BlenderVitals.
Drop Your Blockout in the Comments
Have you tried using blockouts in your workflow? What’s the most useful tip from this guide for you? Leave a comment below — I’d genuinely love to hear how you approach starting new scenes in Blender, and whether the blockout method has made a difference for you.
If you have questions about any step, ask them in the comments and I’ll answer directly.
Keep Building — There’s More Where This Came From
If this guide helped you, subscribe to the blog so you don’t miss new Blender tutorials as they land. Share this post with a fellow artist who gets stuck staring at that blank screen — this method might be exactly what they need.
Check back regularly — this article gets updated as Blender evolves, so you’re always getting the most current workflow.
For more Blender tips and step-by-step tutorials, explore the full Tutorials section.


