
You Can Now Render Blender Animations With AI for Free on Your Computer
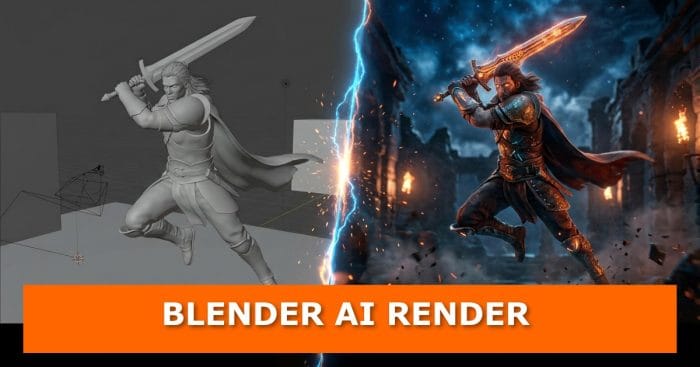
MiniMax just open-sourced H3, a video model that takes a rough play blast straight out of your 3D viewport and turns it into a finished, cinematic shot, complete with sound, and you can now run the whole thing locally in ComfyUI for free.
If you have spent any time on AI video corners of the internet, you have seen the trick before: someone drops a bare-bones 3D layout into a model and pulls out a polished, cinematic shot on the other end. Usually that model is Seedance, and it is genuinely good at this. It is also cloud-only, can run you more than a dollar a clip, and is not available everywhere. MiniMax H3 does the same job, but it is open weight, it runs on your own GPU, and once you have it installed, every clip is free.
What MiniMax H3 Actually Does
H3 is MiniMax’s third-generation video model, following Hailuo 01 and Hailuo 02, and the first one the company has released with open weights. It reads a mix of text, images, video, and audio, then generates a finished video clip with real stereo sound baked into the same generation pass, not bolted on afterward. Output tops out around 15 seconds at 24 frames per second, with resolution up to 2K.
For anyone coming from Blender or Maya, the workflow is refreshingly simple. All you feed it is a play blast, the kind of quick, untextured viewport render animators export just to check timing and staging, plus a text prompt describing what you want the final shot to look like. H3 reads the motion in that play blast and repaints it into a fully rendered scene, following the same camera moves, the same staging, the same timing, but with lighting, materials, and detail that were never actually built.
You can go further by dropping in reference images for your characters, backgrounds, or props, and the model will keep them visually consistent across the whole shot. As a bonus, it also generates its own sound design and music for the scene. You can even hand it a separate voiceover track, and it will sync the character’s mouth to it, effectively giving you free, prompt-driven lip sync.
Why This Is a Big Deal for Small Studios
The Pixel Artistry channel has been building AI rendering pipelines like this for three years, and this generation of tools is a real jump. Earlier workflows needed you to extract full ControlNet data for every shot, edge outlines, depth passes, OpenPose skeletons for characters, just to keep things consistent. H3 replaces most of that with a simple clay pass. The previous model in this workflow also topped out at 81 frames per clip, forcing an awkward stitch-and-fix pipeline to build anything longer. H3’s native 15-second output makes that workaround unnecessary.
None of this replaces a full production pipeline. But for previz, pitch decks, and quick style exploration, being able to reprompt the same camera move into a completely different look, superheroes one take, a snow-covered alien world the next, without touching your 3D file again, is a genuinely useful new tool in the kit.
How to Set Up the MiniMax H3 Workflow in ComfyUI
If you already run <a href=”https://gachoki.com/claude-just-ran-an-entire-blender-and-comfyui-pipeline-solo-and-the-results-are-wild/”>Blender and ComfyUI together</a>, most of this will feel familiar. Here is the setup, step by step.
Step 1: Get ComfyUI Ready
- If you do not have ComfyUI installed yet, grab it and follow a basic install guide first.
- Download the MiniMax H3 workflow file, then drag and drop it directly into the ComfyUI interface.
Step 2: Install the Missing Nodes
- ComfyUI will flag any custom nodes the workflow needs. Click the notification, then click Install All.
- Restart ComfyUI once the install finishes.
Step 3: Download the Models
- Work left to right across the workflow. Each model loader node has a note beside it telling you exactly which file to grab and where it goes in your ComfyUI folder structure.
- Right-click the download link, choose Save Link As, and save it into ComfyUI/models/diffusion_models.
- If you are on an older or lower-VRAM GPU, grab the pruned version of the model instead. It is roughly 12GB, much friendlier for cards like an RTX 3060.
Step 4: Decide on Speed vs. Quality
- The workflow includes an optional speed-up group built around a LoRA plus EasyCache, which lets you run at as few as four sampling steps.
- Four steps tends to cost you visible quality, so eight steps is a better middle ground if you use the LoRA.
- For maximum quality, bypass the speed group entirely with Ctrl+B, then set your sampler steps to 20.
Step 5: Export Your Play Blast From Blender
- Switch your render engine to Workbench, set the shading to Matcap, and pick a neutral matcap.
- Turn on cavity or outlines if you want extra shape definition.
- Set your output path and export directly as a video file.
- For a cleaner alternative pass, switch the shading to Flat, set the color to black, then turn on white outlines. This “outline pass” gives the model more freedom to fill in surface detail on its own, which works especially well for effects like explosions.
- Export at 24 fps to match H3’s native frame rate. The workflow will also trim your clip to one of its supported lengths, so it helps to plan your shot length around that ahead of time.
Step 6: Load Your References and Prompt
- Drag your play blast video onto the reference node, or use the upload button. ComfyUI will automatically resize and reformat it for you.
- In the prompt box, describe each reference clearly: what it is and what role it plays in the shot. For example, calling out the play blast as “an untextured gray clay render from Blender” that defines the layout, staging, and animation.
- Optionally, add a timeline within the prompt to call out moments where the shot should change partway through.
- You can also write an audio prompt here to generate music or foley for the scene, or attach your own voiceover clip for lip sync.
- If you want more visual anchors, activate the image reference nodes and upload character, background, or environment images.
Step 7: Run It
- Turn on preview mode so you can watch the shot develop during sampling. It slows things down slightly, but it lets you catch a bad generation early instead of waiting for the full render.
- Click run.
One thing worth knowing before you start stacking references: sparse or low-detail backgrounds, like a plain white backdrop, give the model very little to track the camera against, which can cause subtle sliding in the final shot. Adding even simple details like a floor grid or rough building blockouts gives H3 something concrete to lock onto.
Watch the Full Breakdown

The video walks through several real example shots built with this workflow, including a complex ocean scene where the entire water simulation, waves, splashing, everything, was generated by the model with no actual water ever built in the 3D scene. There is also a fast-moving camera test tracking cleanly with zero reference images, a lizard character reskinned into new outfits and locations, and a lip-sync test pulled from an older shot originally built with a different model.
If you want to push this further, an advanced version of the workflow adds more reference inputs plus an upscaling pass built on SeedVR2, taking your final renders up to 2K or even 4K.
Where This Workflow Fits Into Your Pipeline
If you are already experimenting with camera work in Blender before you get to a stage like this, it is worth locking in your shot fundamentals first. A play blast is only as useful as the camera move behind it, so brushing up on how to orbit a camera around an object or how to make a camera follow multiple paths at once will make your reference clips stronger before they ever touch ComfyUI.
The same goes for what is happening on screen while the camera moves. Since H3 leans heavily on your play blast for staging and lighting cues, getting the fundamentals right in Blender first, like knowing a few lighting tricks, understanding how to re-texture a scene without re-rendering, or nailing details like water ripples, perfectly curved objects, dynamic cables, and clean geometry through faster UV unwrapping or precise circular cuts, gives H3 a much stronger foundation to build the finished shot on.
What’s Next
MiniMax H3 launched with open weights on August 3, 2026, so this is genuinely brand-new territory, and the creator behind this workflow has already said an updated version is coming within weeks as the community optimizations, especially the speed-up LoRAs, mature. If the jump from the previous model to this one is already this noticeable, it is worth keeping an eye on where this goes next. Have you tried running a play blast through H3 yet? Drop your results in the comments, and if you are building out your own Blender-to-ComfyUI pipeline, stick around, more workflow breakdowns like this are on the way.

What do you think?
Join the Conversation